Sunday, 1 July 2018
Monday, 14 May 2018
Saturday, 12 May 2018
Saturday, 31 March 2018
Major - Updated Pose Shots
I am still having trouble creating the 2d bushes within maya. They keep rendering without the transparent background but I am unaware why as the method I am using should be correct. I will try to resolve this during the week. I have updated the floor plane and the lighting to give a cleaner look to the scene. I still wish to place the stand in trees by dynamics, which will allow them to be scattered randomly across the plane at a random size and rotation. I still need a bit of help with this but again, will get this resolved during the week.


Wednesday, 28 March 2018
@Phil - Pose Shot Updated
I have changed the lighting and the shadows within shot number 2 from the ones uploaded earlier. I am currently working on adding bushes and leaves. I have a few bushes designed but am struggling to get these to work when rending in maya, as the method I am using is what worked for the 2d mouths, so I am unsure as to why the transparent background is not working. I will try to resolve this tomorrow in uni. For the leaves I am yet to draw them out but I was thinking of simply using swirls to fit into the theme of the bushes and trees, please let me know your opinion on this. Overall I feel as if the lighting for the pose shot below is better than the previous. If you have any suggestions please let me know.


 |
| Bush design 1 |
 |
| Bush design 2 |
 |
| Bush design 3 |
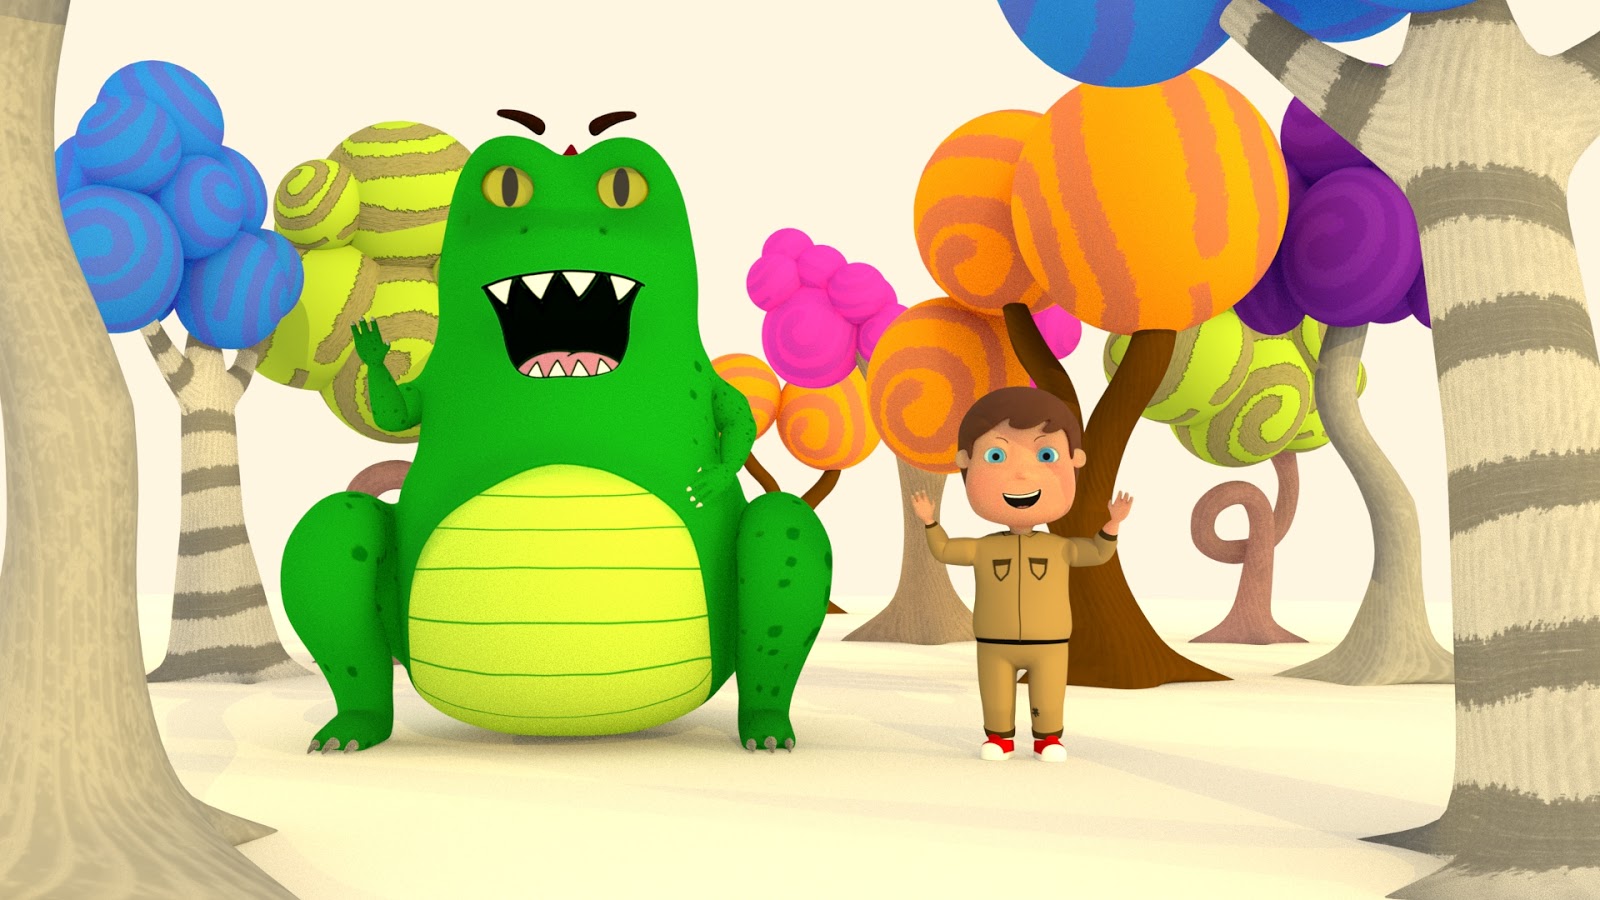
Major - Promo Shots
I have created and rendered two different pose shots to show the scale of the two characters and the outside environment. When actually creating the animation I will use stand in's for the trees to create a jungle. I also plan on using matte paintings to wrap around the scene to fully immerse the viewer into the environment.

Tuesday, 27 March 2018
Major - Initial Render
Before attempting to animate my first scene I placed my character within the environment and posed him in a shot that will take place in the animation. I am very happy with how the characters fit into the environment and am excited to start to animate my first scene.

Updated - Major - House Textured Renders
I have now textured the inside of the house using mostly painted textures with a combination of normal maps and bump maps. The aim of the setting is in the afternoon and I feel as if the lighting used fits this. I had to render the scene a few times to ensure I had the correct render settings to eliminate any noise from shadows and to attempt to speed up render time. The render settings I favoured most was the ones used for renders 3 and 6, although taking slightly longer it eliminates the noise which is present in the other renders.
 |
| Render 1 |
 |
| Render 2 |
 |
| Render 3 |
 |
| Render 4 |
 |
| Render 5 |
 |
| Render 6 |
 |
| Internal Lights |
 |
| Internal Lights |
Friday, 16 March 2018
Major - Tree Renders
I have designed and modeled 5 trees that will be placed around the scene randomly, using stand in's to shorten render time, but these will be used to create the jungle. The jungle is within Juniors imagination so for the trees I have focused on bright simple colours that children would see all the time from their every day activities such as colouring in books and from children's television.


Major - House interior first renders
I have modelled and UV'ed the interior of the house which is the setting for the first scene. I need to work on the lighting to bring a homely feel to the house, but overall I am happy with the overall appearance of the house.


Thursday, 15 March 2018
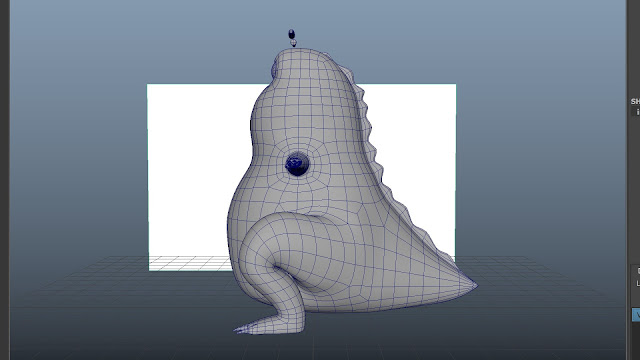
Major - Final renders and turnaround for Garbage-o-saur character
 |
| Ambient Occlusion Render |
 |
| Final Render |
Wednesday, 14 March 2018


Wednesday, 21 February 2018
Major - Garbage-o-saur Character UV'ed
I have now uv'ed my character, creating suitable uv maps to allow texturing of the character. I will now go on to completing my shot list to a full extent before rigging my character to find aspects in which I can get away with not including within the rig to save production time.


Sunday, 18 February 2018
Major - Garbage-o-saur Character Finished Model
I have finished the modelling for my Garbage-o-saur character. The next steps will be to UV the character before moving onto creating a suitable rig.


Saturday, 13 January 2018
Minor - Reflective Statement
For my minor project submission I am generally happy with what I have achieved. Mostly I am happy with how much more comfortable I feel working within maya. I am disappointed that I was unable to complete both characters for the animation, but this was due to running into issues and problems while creating the first character. Even though these issues meant I could not finish the second character in time, they have allowed me to refine my character creation skills in maya. I have learnt simple tricks and processes within the character creation pipeline that I believe will allow me to create my second character in under half of the time it did to create my first.
With the overall look and feel of the character I am very happy as he fits the style of animation I was aiming for perfectly. The use of the 2d facial rig worked very well with my character and I am happy I made the decision to build 3d eyes which can give the character more emotion, by being able to move the eye lids.
For the individual processes of character creation pipeline, i.e modelling, UV'ing, rigging etc. I found that at the start of this project my strongest aspect of this was the character modelling. But after working on the character and the amount of time I spent rigging and skinning as well as adding controls, I feel as if it has almost made me a stronger artist in these aspects.
I have tried to put in extra effort this project as well, experimenting with different types of rigs and controls, working to find which on will be best suited for my character. An example of this is I experimented with an IK/FK rig, creating this on it own to see how it works and how I could apply it to my character. From doing this I noted several issues I encountered along the process and came to the conclusion that I was better off sticking to the arm rig that I know, to save time and allow me to complete the character in time.
With the pre viz I feel as if I am happy with the majority of my shot selection, but I still need to do some editing to get the timings better to fit with the pace of the animation, but still to show what is needed to be shown on screen.
The area in which I felt I struggled the most was the 2d drawing side and the initial character development. I knew how I wanted my characters and world to look, but I find it very difficult to portray these through concept art and drawings as I have much more of a 3d mindset. I have thought about this issue a lot and although I have tried to work on my drawings, the rate of improvement is at a slow pace. An option that I am considering for pieces of concept art, that will be needed in the next project, is that I could collaborate with an artist, giving them initial sketches and referencing to explain how I want the piece to look, then work very closely with them throughout to ensure I would have a much more accurate and professional looking piece of concept art.
Overall I was happy with my minor project submission and I feel as if I am in a good place going into the major project, as a lot of this project will take place in maya and be a lot more actual production and use of the software, rather then just the pre production of the animation, which was majority of the minor project.
Thursday, 11 January 2018
Wednesday, 10 January 2018
Sunday, 7 January 2018
@Alan - Maya Keyframe Issue
I have been trying to create the turnaround for my character but for some reason when I set keyframes it causes they eyes to have an offset from the body. The character can be moved around with the world control with no issues but as soon as a keyframe is set and I scrub through the timeline this causes the eyes to break. I am unsure why this is happening and am unable to render character turnarounds without being able to fix this. Help would be greatly appreciated.


Minor Project - Final Character Render
I still need to work on the noise reduction and the render settings but I am struggling a little bit in Arnold. For now I am happy with what I have and will go on to create a character turnaround to display the finished character.


Saturday, 6 January 2018
Minor Project - 2D Mouth and Eyebrow Rig
I have finished created a 2d mouth and eyebrow rig for my character. All I need to do now is to sort out the shading network for the textures so they will look how I want them to when rendered and my character will be complete.
Once the character is complete I am going to go on to create a pre viz, then to start modelling the Garbage - o - saur.


Once the character is complete I am going to go on to create a pre viz, then to start modelling the Garbage - o - saur.
Subscribe to:
Posts (Atom)